Saturday, June 30, 2012

pumpkin spice almond butter

Yep, here's the follow on recipe from my previous post.

As mentioned - I've recently come into a wealth of pumpkin.


I was so happy when I came in to work and saw a large jap pumpkin sitting under my desk.

To be honest, right then and there I was already looking forward to getting home and preparing this recipe - needless to say, it was a long day.


Smooth and creamy, this pumpkin butter won't last long in your household.

Spread over some homemade bread or use as a fruit dip, it's like you're eating a pumpkin pie - only healthier!


Ingredients

(makes 500mL)

1 c roast pumpkin puree
1 tblsp back strap molasses
1 tsp ginger, ground
1 tsp cinnamon, ground
2 clove heads, crushed
1 cardamon pod, crushed
1/2 tsp nutmeg, grated

Combine all ingredients in a food processor and blend until creamy and smooth.
Store in refrigerator for up to 2 weeks.


Thank you dear pumpkin bringer - this one's for you! xo

Thursday, June 28, 2012

roast pumpkin, zucchini and spelt pan quiche - vegan

What to do when a friend gives you a giant pumpkin.

Roast the heck out of it, of course!

Then it's a matter of finding recipes to incorporate the roast pumpkin in to.


I've been playing around with some pan breads lately using my cast iron pan as it's own oven.

It's been working pretty good so I thought I would share one of my recipes with you.


Not really coming out as a bread, but more of a quiche - this was a tasty winner.

Joel came up with the name pan-quiche. He thinks he's a genius - I gave him a high five.


Ingredients

(makes 8+ slices)

3 c fresh roast pumpkin, puree
2 medium zucchini, grated
1 tsp salt
1 tblsp olive oil
1 tblsp chia seeds
1 tsp bi carb soda
2 c wholemeal spelt flour
1-2 tblsp pinenuts
1-2 tblsp pumpkin seeds

Place all ingredients (omitting the pumpkin seeds) in a large bowl and combine thoroughly.
Next, line a heavy based saucepan with baking paper, and spread mixture into the pan - evenly.
Sprinkle over the pumpkin seeds.
Place lid on top and put on stove.
Cook over low heat for 15-20 mins.
Remove from heat and flip the pan quiche over*.
Cover and cook for a further 15-20mins.
Cool, slice and serve.

*To Flip:
Cut a piece of baking paper, the roughly the same size as the one in the pan.
Spread it on a wooden chopping board.
Place board over the pan and flip.
The pan quiche should now be face down on the new sheet of baking paper.
You then simply slide the baking paper with the quiche on it, back into the pan.


there's another pumpkin post coming - stay tuned.. xo

Tuesday, June 26, 2012

sour orange and fresh coconut sauce


The other day when coming home, we pulled into our street to see two of our little neighbours holding up "oranges, lemons, mandarines - for sale".

They were so cute! I think that was their main marketing strategy.


The two girls had a little table set up at the start of the road, trying to catch customers.

I HAD to stop.

They'd gone out earlier that day and picked some fresh citrus fruit from their orchard.

I ended up with $4 worth of goods (2 kg oranges, 5 lemons, 5 sour oranges). As a tip I gave each of the a $2 coin for being so adorable, they were so happy.


This sauce is super versatile - you could use it as a sweet, kind of like a lemon curd, or you can add it to some grilled tempeh/tofu steaks. We ended up eating it with some steamed blue-eye cod.

Ingredients

(makes 400mL)

2 sour oranges, peeled and de-pitted
1 c young coconut flesh
a pinch of vanilla salt

Combine all ingredients in a blender/food processor and whiz until thick and creamy.


Serve.

Sunday, June 24, 2012

sashimi with pickled ginger

We love our seafood. 

Seriously can't get enough of it.


And at least once a week, I make a dinner of sashimi.

I remember when we got into Japanese food, and thought it would be so dangerous to prepare sashimi at home.

But really, it's so easy!

You just need a nice sharp knife and a bit of bravery.


A visit to my local fish monger and I came away with some fresh tuna, blue eye cod and seaweed salad.


Sashimi

Method

fish of your desire (tuna, salmon, swordfish, blue-eye cod, marlin etc)

On a clean wooden chopping board, place the fillet*.
With a sharp knife, slice as finely as desired - against the grain.
Return to the refridgerator until required.
Serve with pickled ginger (recipe below), wasabi paste and soy sauce.

*Tip: you may find it useful to place the fillets in the freezer for 10 mins for ease of slicing.


Pickled Ginger

Ingredients

fresh ginger
mirrin
japanese vinegar
water

Finely slice the desired amount of ginger.
Fill a jar with the sliced ginger.
Then mix a third of each mirrin, vinegar and water.
Pour over the ginger until all covered.
Screw on lid and shake vigourously.
Leave to pickle the refrigerator for 4 weeks.
Then it's ready to serve.


As mentioned on my previous post, here is an example of what I used my sprouts for.

The spicy mustard sprouts go perfectly with the metallic taste of the tuna while the cress sprouts go so well with the butteriness of the blue eye cod.

Friday, June 22, 2012

sprouting: how to


It's just earth shattering when you go to pick a few leaves off your kale plant and you see this!

More like, you see nothing..

All munched up.


Meanwhile...

On the other side of the garden... it's a little bit sad... the possums have walked all over my purple carrots and eaten my brussel sprouts, kohl rabi and broccoli.

The carrots are still growing, luckily.


Between the kangaroos, possums, wombats, potoroos, birds, bush turkeys; I guess I should be grateful if anything makes it.


So, now the dilemma - how to keep my plants alive.

For now, I'll put that on hold and work on my indoor sprouting.

I love sprouts and growing your own is not only cost effective but so easy to do.


How To:

Line a tray with organic cotton balls.
Sprinkle 1 tblsp of desired sprout, over the cotton.
Then, water until the seeds so that the cotton absorbs all the moisture.

Cover for the first day or two until the seeds have started growing.


Ensure that there is enough water by gently pressing your finger on the cotton and if moisture gathers around your fingertip - then that's sufficient.


Sit the seeds by a well ventilated and sunny window for some photosynthesis.


Allow to grow for about a week or so - depending on what you are sprouting.


Snip the sprouts at the base and add to a salad or to garnish a meal.


Example to follow...

x

Tuesday, June 19, 2012

wellbeing stir fry with green tea noodles


There are never enough hours in the day!

With my hours at work having picked up lately, I'm finding it a juggle to fit everything (fitness, blogging, housework, entertaining etc) into the limited time I have in the evenings. 

So, when I am time poor, I love a quick throw-together stir fry that has a rainbow of colours with minimal cooking time for a warm yet fresh dinner.

The more colours you can enjoy with your food the better.

Not only is it appealing to the eye, but also, each vegetable holds its own nutritional content and to combine and vary what you eat is great for all-round wellbeing.


Ingredients

(serves 2-3)

100g green tea noodles

1 tsp pure sesame oil
1 tsp fresh ginger, grated
3 garlic cloves, sliced
1/2 red hot chilli, finely sliced (optional)
1 tblsp soy sauce
1 tblsp mirin sauce
10 button mushrooms, finely sliced

2 bunches of baby pak choy, finely sliced
1 red banana pepper, finely sliced
4 shallots, finely sliced
1 c purple cabbage, finely sliced

1 tblsp dried wakame
1/2 c peas
1/4 c roasted cashew nuts
1/4 c fresh coriander, roughly chopped

Cook noodles in boiling water for about 5 mins - until tender.
Drain and rinse with cool water - set aside.
Next, heat oil in a wok and add ginger, garlic and chilli - cook for 1 min stirring constantly.
Then add the soy, mirin and mushrooms and continue to cook until mushrooms are softened and browning.
Then add the pak choy, pepper, shallots and purple cabbage and toss for a minute or 2.
Then toss through the seaweed, peas, nuts and coriander. 
Remove from heat and toss through the noodles*.
Serve and enjoy!

*You may need to re-rinse with cool water to prevent sicking.


Sunday, June 17, 2012

coconut kefir yogurt and water


Well, I promised that I would post my kefir experiments.

This is a post about my successful coconut and kefir experiment.


I love using coconut in cooking.

From coconut oil, water, cream, milk and flesh - the rich flavour is so satisfying.

Not to mention the healthful benefits that coconuts have to offer.

Flesh
Young coconut meat differs greatly from mature coconut -- it has a softer, almost gelatinous texture that you can use to mix into beverages or baked goods recipes. You can tell the difference between a young and mature coconut because a mature coconut is hairy and brown, while the immature version is smooth and green. Also, the nutritional value of young coconut meat differs, as it contains fewer calories, no fat and many vitamins and minerals.
High in: Manganese - a mineral that is beneficial for production of blood clotting factors and connective tissues. Potassium - this mineral keeps your muscles and digestive system working properly, and adequate intake may correlate to bone health as well. Magnesium - the magnesium available in young coconut influences energy production and also plays a role in the function of your muscles and kidneys. Magnesium is critical for maintaining mineral and vitamin levels in your bloodstream, including calcium, copper, zinc, vitamin D and potassium.

Water
Coconut water aids the kidney, liver and heart functions as well as enhances the process of eliminating toxins from the body. The electrolyte level re-equilibrates the body's fluid balance; therefore it is sometimes referred to as "Fluid of Life".
Coconut water enhances concentration and prevents headaches by providing the body with all the necessary replenishing fluids as it impacts positively on the electrolyte level content in the body.
With a balanced proportion of potassium, calcium, magnesium and sodium coconut water offers a speedy revitalisation and re-hydration during the course of physical activities - we love it after a big hike.
Coconut water on it’s own can be used as an alternative to milk, as it helps in bone fortification.
Since this drink is lactose free and milk-protein free there is no danger of developing allergies in young children.


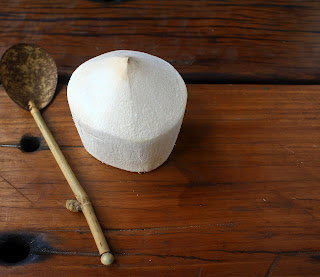
From a fresh young coconut, I was able to make this coconut yogurt.


Additionally, as a by-product I was able to make a pro-biotic coconut water drink.

My grandmother was a missionary Nurse out in the islands back in the 50's and she told me that they used to use the fresh water of the young coconuts as a saline solution for injections. This was because the coconut water was more sterile than the drinking water.

Interesting, huh!


Ingredients

(makes 1-2 cups)

1 fresh young coconut
1/2 c water
2 tsp milk kefir grains

Crack open the coconut and carefully drain out the water, set aside*.
Scoop out all the rubbery flesh and combine with water in a food processor/bender and whizz until well thick and creamy - add more or less water for desired consistency.
Pour into a glass jar.
Then, wrap the kefir grains in a small muslin cloth and tie.
Next, place the kefir grains in the middle of the coconut mixture.
Cover the glass with a muslin cloth and fasten with a rubber band.
Cover jar with a tea towel to keep warm.
Set aside for 24-48 hours.
Then, remove the grains and stir up your yogurt, it's ready!

The yogurt should taste slightly sour with the deep rich flavours of coconut.

*You can either drink this straight up or, if you have some water kefir grains you can add 2 tblsp to the coconut water - cover and let the pro-biotics grow for 24-48 hours.
Strain and drink.


Thursday, June 14, 2012

goji berry, orange blossom and pine nut biscotti

I swear my tea intake has multiplied to dangerous levels since the cooling of the weather.

There is just nothing like sitting by the fire with a steaming cup of herbal tea on these cold winter evenings.

But, sometimes a cup of tea can get a little bit lonely all on it's own.


I have a not so secret love of goji berries. Sprinkled on breakfast, baked into bread, added into a trail mix or my personal favourite - by the handful. 

These little nutritional powerhouses offer so much for the body.

Goji berries have an incredibly high concentration of nutrients compared to other foods. They are high in antioxidants and are also a rich source of vitamins A, C, B1, B2, B6, and E; minerals, including calcium, potassium, selenium and zinc; many amino acids, protein and fiber.

Antioxidants are key elements in preventing damage of our cells by free radicals, or polluting molecules in our bodies. The total antioxidant power of goji berries is about 10 times that of blueberries; one of the highest levels in the food world.

Now, what to make with my goji's.

While browsing the cupboard looking for ingredients, I stumbled upon an unused item. Ages ago while cruising the shelves of a Turkish grocer I came across Orange Blossom Water. With no idea of what I would use it in, but as something that I hadn't tried, I decided to grab it anyway.

That's when it hit me. Goji and orange would go great together.

Add in some nuts and you have biscotti!


Ingredients

(makes 12 slices)

1 organic free-range egg

8 drops of stevia
1/4 c coconut sugar
1/2 tsp orange blossom water

2 tblsp pine nuts
2 tblsp goji berries
3/4 c plain flour

Heat oven to 150 degrees.
Next beat the egg in a medium bowl until thick and creamy.
Add stevia, sugar and orange blossom water and beat until sugar has dissolved.
Fold through the nuts, goji berries and sifted flour until mixture comes together in a dough-like consistency.
Shape into a log and bake in oven on a baking paper lined tray, for about 25 mins.
Remove from oven and cool completely.
Using a serrated knife, slice the 'bread' into desired thickness. 
Lay back on the baking tray and return to oven to crisp up - about 10 mins turning the biscotti once for even toasting.
Done.

dip and enjoy x

Tuesday, June 12, 2012

curly endive fritters


We went to the zoo the other day and it just poured down rain with no respite.


Torrential rain.

All day.


The king of the jungle was not impressed.


Can you spot the tiger?


The tiger cubs were so cute and playful in the rain.

We stood watching them for about an hour - hiding in the grass, pouncing on and chasing their mum.


The elephants were enjoying splashing about in the water.

Adorable.


For brief relief from the downpour, we shuffled into the reptile tunnel. 

These little guys had the right idea. It was heated in there, warm and dry.

My next recipe draws inspiration from my little turtle friends here.


Munching down on some curly endive, a light bulb went on in my mind and suddenly I had a hankering for endive.

When we got home, I really hoped the market had some endive in stock.

We were in luck!


Usually a bunch of curly endive in our house is chopped into a salad, but this time I wanted to try something a little different.

And I was in the mood for either some soup or fritters.

Fritters lucked out. 


Ingredients

(makes 12)

1 bunch curly endive, chopped

1/2 bunch of parsley
1/4 preserved lemon
3/4 c rolled oats
1/4 c self raising flour
1 tsp bicarb soda
1 tblsp yeast flakes
salt and pepper to taste

oil for frying (I've used tea seed oil)

Saute endive for about 4-5 mins until wilted.
Combine with all other ingredients in a bowl or a food processor - stir/pulse until well combined.
Heat a teaspoon of oil in a heavy based pan.
Scoop dessert spoon sized portions of the mixture into the pan and flatten.
Fry on each side for about 5-7 minutes.
Serve.